
Wednesday, November 28, 2012
Monday, November 26, 2012
If I had a necklace made out of tiny suns...
"If I had a necklace made out of tiny suns, I’d only wear it at night when you could really see it. Sadly, I don’t have a necklace like that. The closest thing I have is a necklace made out of those glow in the dark stars you stick to bedroom ceilings. But I only wear that on special occasions, like bedtime."
~Jarod Kintz
~Jarod Kintz
Friday, November 23, 2012
Black Friday!!!
All our items are 20% off today through Midnight on Monday the 26th!

Be sure to visit our Etsy store to get some fantastic deals!
Thursday, November 22, 2012
Happy Thanksgiving from Pink Astilbe!
 |
| Vintage Card design found on retronaut.com |
(Is it disturbing to anyone else that there is a baby weilding a large knife, wearing nothing but an apron, running after a large turkey?)
Monday, November 19, 2012
Charlie Brown Thanksgiving
Talk about Vintage!

I will be showing this in my ESL classroom tomorrow as we will be off the rest of the week for the Thanksgiving holiday. It is one of my favorite movies and we always have excellent discussions from it. We talk about traditional foods, manners - both good and bad, and any other questions that may arise as my students watch. They particularly like when Snoopy and Woodstock dress up like Pilgrims, AND when Snoopy gets in the fight with the folding lawn chair.
If it's been a while since you've seen it, here ya go!
Friday, November 16, 2012
The Evolution of My Product Photography
I've now had my Pink Astilbe Vintage Etsy shop for just over 2 years. During the course of that time, I've been complimented on my product photography. I try very hard to get good, crisp, bright, close-up shots of the jewelry that I list. Now, I am by no means a professional, and if you click through my shop, you'll find some photos that are grainy, slightly blurry, and just not quite "right." That's more a testament to the fact that I've been lazy and not wanted to re-shoot pictures than the fact that I'm not a professional.
There may be people who will read this blog post who will point out that I am not a "real" photographer. They're right. They are absolutely right. This posting is merely to document my evolution in how I've photographed pieces for my store than to be a tutorial. I spend roughly 2 to 3 hours a week taking photographs, compared to people who do this full time. I know that I still have LOADS that I have to learn.
If you are deliberate in your photo-taking, and willing to read, study and ask questions, I believe that anyone can take good product photography for their Etsy shops, including me.
 I started out using a standard point and click camera on "macro" mode. This fact surprises people. They thought that I was using a fancy-schmancy camera. I didn't "upgrade" to a fancy-schmancy camera until last year. I got a nice Canon Rebel DSLR camera as a combination Master's Degree graduation / birthday present. (Learning how to use that is a different blog post for the future)
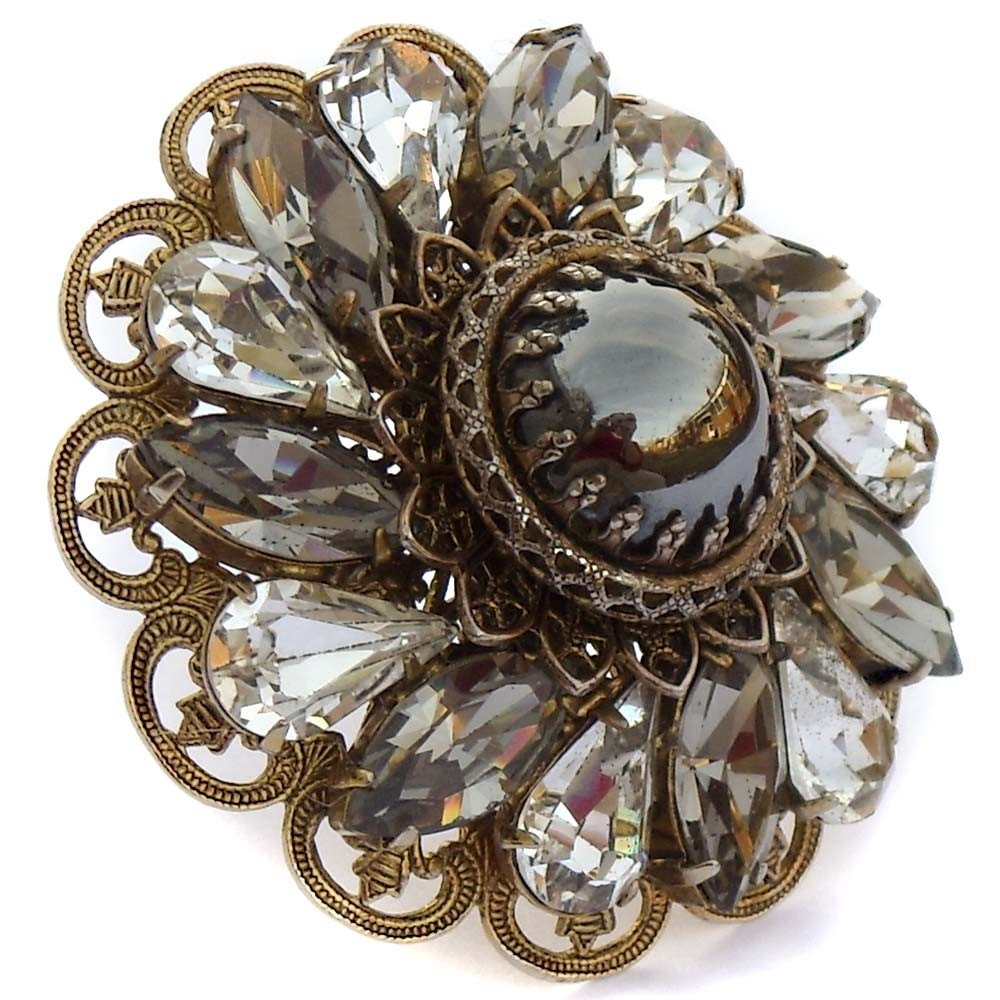
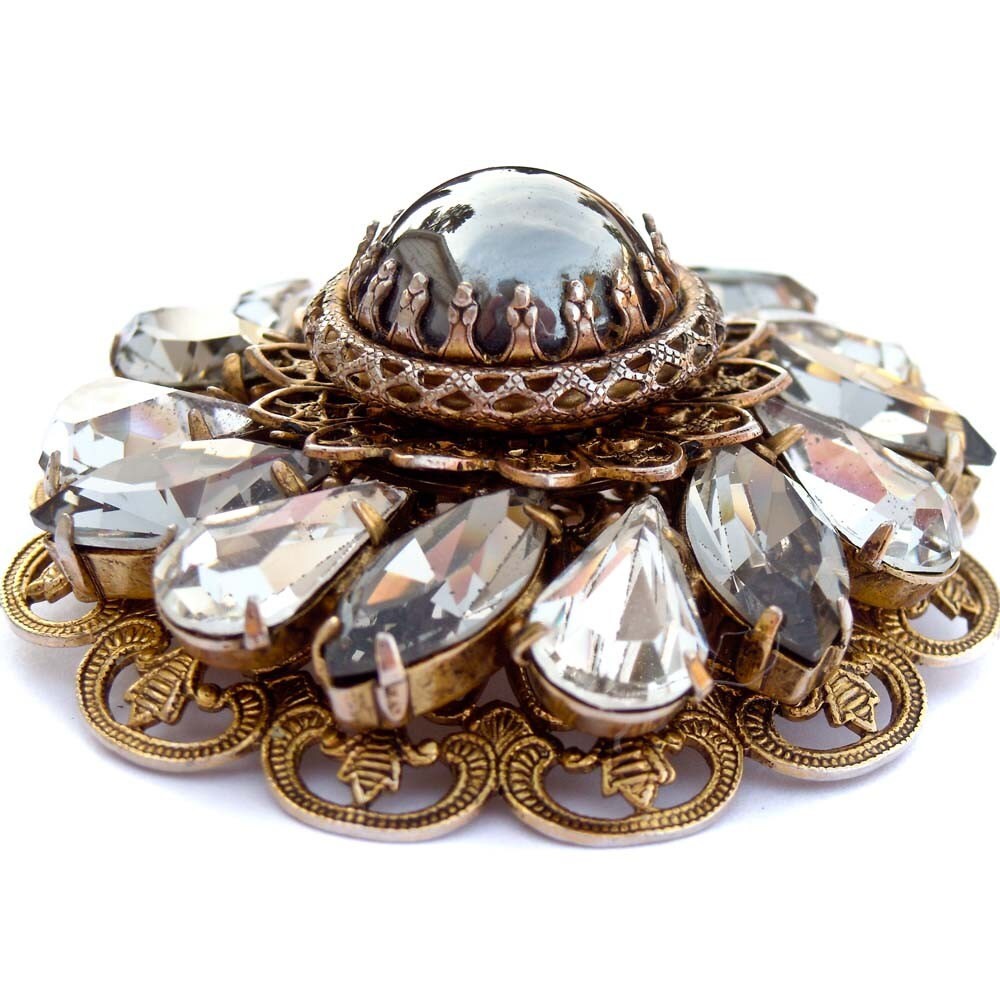 What I did do, was read as much as I could on product photography. Most agreed that natural light is PERFECT. So what did I do? I went outside and set up a little stool, with some white paper on it and placed my piece of jewelry in the center. It wasn't perfect, but I still got great pictures like this hematite brooch to the right. (Honesty alert - I did, and still do, use photoshop to clean up the background of specks of dust and shadows)
In fact, if you look closely, you can see a reflection of me, my house and my garage in the center stone of this brooch!
The downsides were quickly apparent. I was dealing with wind, CONSTANT wind! I live in the Chicago area, so it wasn't just wind I was dealing with, but I was also dealing with weather. Taking pictures outside on a stool is all fine and good when it's warm and sunny out, but what about the 9 months out of the year when it's either cold and rainy, cold and snowy, or absolutely FRIGID? I had to find some other way of taking photos that was much more efficient and less likely to end up with piece of jewelry being violently tossed around my yard when the wind caught the paper it was sitting on and lifted it up.
So I went back to the internet and did some searching for Etsy Product Photography. I found this great blog post from Handmadeology entitled "Simple Product Photography." It didn't really have much technique per se, however there was one line in it that struck me as an "a-ha!"
I didn't have to go outside to get natural light!!! I could use my windows! (I'm not really proud of this moment, but sometimes it takes an outside force to get us to have common sense sometimes...) The problem was, getting my jewelry up near my windows. So I brought back my stool, stacked a bunch of books on it, and set it up next to the window, with my handy sheet of white paper.
I then had my next problem to work out. Shadows. Harsh shadows. Shadows that were making it difficult to get really nice shots. I went back to Handmadeology, which has MANY MANY wonderful posts about photography, and found this post: Studio Quality Product Photography with a $12 Set Up.
Following their directions, I came up with this....

Notice how much higher off the table my window is than on the Handmadeology website. Not only did I have to drag my table over to the window, but I had to denude my bookshelves in order to do it.
Granted, it worked VERY effectively, but it wasn't efficient. However, I continued to use this set up, or minor variations of it for at least a year, before growing discontented and wanting to "up my game" to the next level of product photography.
BACK TO THE INTERWEBS!!! (Say that in your best superhero voice!)
I found several great articles on making your own lightboxes, but this is the one that I followed the most closely: How to Create an Inexpensive Photography Lightbox
 Except, technically, I didn't make it. My husband did. I've never been that good with razor blades, and I was getting a little frustrated. For the fabric diffuser parts, we used worn out undershirts, which were perfect!
This is what we came up with. I was so excited, that I ran out to Target to get a new light to use with it! And then gave up on it within a week. Unfortunately, we didn't use a big enough box for me to use my necklace display on it, and I only had the one light source, so despite having the diffused light, I still got funky shadows.
I think if I had had the spare money for TWO lamps instead of one, and I had made the piece using a bigger box, it would have been much more effective.
So I ended up going back to a variation of the table-at-the-window-natural-light-plus-white-paper set up. I don't have a picture of that one, though. (Sorry.) In that case, I added a piece of light weight super thin mdf board covered with tinfoil to use as a light reflector, and two pieces of white mdf as a base and back-board in order to reduce my reliance on keeping sheets of white paper clean and unwrinkled. (I did also have a habit of using the nearest piece of paper as note paper when taking messages or jotting down ideas, often that was the paper that I was using as my backgrounds... oops).
 Within the past two months, I have been getting more and more discontent with my set up as I haven't been getting home from my first job until after dark. How can I take pictures using natural light when it's dark out? Using just the light in my house isn't feasible as I have yellow walls, and yellow toned lights, and it's really hard to get good quality pictures when everything looks jaundiced.
So I started looking for "real" light boxes. I finally talked myself into "splurging" for a light box. I found one on amazon for $25 that is big enough to fit all of my jewelry paraphernalia and still get me good backgrounds. It had great product reviews and didn't break the bank. So I bought it!

Remembering the debacle with my one little light, I also found a set of "real" mini photography lamps. I got those too! They were "only" $50. I justified their purchase with the knowledge that a) I didn't have 2 portable lights, b) I couldn't very well take good photographs in the dark, and c) I actually had money available from my store to pay for them - they're a legitimate business expense!
As soon as they both arrived, I couldn't wait to get them set up. But I had to figure out WHERE! I did not want to set up a "permanent" photography studio in my dining room. Granted, that's where all my jewelry stuff has been for the past two years, only getting hurriedly packed up every time someone came over for dinner or for a visit. However, I wanted to set up something a bit more permanent and less likely to make my dining room look like a disaster.
So I set them up in our spare bedroom... If you're coming to visit, know that until the few moments before you came, that room looked like a jewelry-box and photo-studio exploded.
The spare room is less likely to need to be hurriedly cleaned up, AND I get the added benefit of being able to close a door on the mess.
Here's my newest set up. If you can't tell, it's actually set up on a couch that we have in the spare room. I re-cycled the mdf boards from my previous set up and used them as a "tabletop" across the seat of the couch, allowing the lights to be set up on either side of the light box.

The only downside, is that it's low to the ground. Never mind... I've improvised yet again! I've got an old milk crate that I've topped with a couple of old bed-pillows. Makes a nice low stool! So now, I'm getting much more consistent photos, at any time of day, and I don't feel so bad leaving it up all the time!
So that's it...how my set up has evolved over time. To be honest, it hasn't really changed the over quality of my photos. It has changed the CONSISTENCY of my photos. With my first set ups, I had to take 20-30 photos on average of each of my items in order to get 4 or 5 great photos for my listing. Now, I can take fewer photos to get the same number for my listings. They're still great photos, no matter whether I used the point-and-shoot or the DSLR. They've still got great detail, no matter whether I used the pile of books next to the window, or my fancy light-box.
For me, it has just made the process easier to have nicer, more CONSISTENT equipment. Each time I've "upgraded," taking photos has become easier, more pleasant, and something I look forward to more.
Although, to be even more honest, I do think my quality has improved too. That has come with practice, reading blogs about product photography, and watching YouTube videos about product photography.
I still don't think I'm an expert. In fact, I KNOW that I'm not an expert. But at least I'm still learning and sharing what I've learned!

There may be people who will read this blog post who will point out that I am not a "real" photographer. They're right. They are absolutely right. This posting is merely to document my evolution in how I've photographed pieces for my store than to be a tutorial. I spend roughly 2 to 3 hours a week taking photographs, compared to people who do this full time. I know that I still have LOADS that I have to learn.
If you are deliberate in your photo-taking, and willing to read, study and ask questions, I believe that anyone can take good product photography for their Etsy shops, including me.
I started out using a standard point and click camera on "macro" mode. This fact surprises people. They thought that I was using a fancy-schmancy camera. I didn't "upgrade" to a fancy-schmancy camera until last year. I got a nice Canon Rebel DSLR camera as a combination Master's Degree graduation / birthday present. (Learning how to use that is a different blog post for the future)What I did do, was read as much as I could on product photography. Most agreed that natural light is PERFECT. So what did I do? I went outside and set up a little stool, with some white paper on it and placed my piece of jewelry in the center. It wasn't perfect, but I still got great pictures like this hematite brooch to the right. (Honesty alert - I did, and still do, use photoshop to clean up the background of specks of dust and shadows)In fact, if you look closely, you can see a reflection of me, my house and my garage in the center stone of this brooch!
The downsides were quickly apparent. I was dealing with wind, CONSTANT wind! I live in the Chicago area, so it wasn't just wind I was dealing with, but I was also dealing with weather. Taking pictures outside on a stool is all fine and good when it's warm and sunny out, but what about the 9 months out of the year when it's either cold and rainy, cold and snowy, or absolutely FRIGID? I had to find some other way of taking photos that was much more efficient and less likely to end up with piece of jewelry being violently tossed around my yard when the wind caught the paper it was sitting on and lifted it up.
So I went back to the internet and did some searching for Etsy Product Photography. I found this great blog post from Handmadeology entitled "Simple Product Photography." It didn't really have much technique per se, however there was one line in it that struck me as an "a-ha!"
"Next, I pulled a rickety, old, $1 table over to the open door (an open door or window are my favorite places to take product photos). "
I didn't have to go outside to get natural light!!! I could use my windows! (I'm not really proud of this moment, but sometimes it takes an outside force to get us to have common sense sometimes...) The problem was, getting my jewelry up near my windows. So I brought back my stool, stacked a bunch of books on it, and set it up next to the window, with my handy sheet of white paper.
I then had my next problem to work out. Shadows. Harsh shadows. Shadows that were making it difficult to get really nice shots. I went back to Handmadeology, which has MANY MANY wonderful posts about photography, and found this post: Studio Quality Product Photography with a $12 Set Up.
Following their directions, I came up with this....

Notice how much higher off the table my window is than on the Handmadeology website. Not only did I have to drag my table over to the window, but I had to denude my bookshelves in order to do it.
Granted, it worked VERY effectively, but it wasn't efficient. However, I continued to use this set up, or minor variations of it for at least a year, before growing discontented and wanting to "up my game" to the next level of product photography.
BACK TO THE INTERWEBS!!! (Say that in your best superhero voice!)
I found several great articles on making your own lightboxes, but this is the one that I followed the most closely: How to Create an Inexpensive Photography Lightbox
 Except, technically, I didn't make it. My husband did. I've never been that good with razor blades, and I was getting a little frustrated. For the fabric diffuser parts, we used worn out undershirts, which were perfect!
 This is what we came up with. I was so excited, that I ran out to Target to get a new light to use with it! And then gave up on it within a week. Unfortunately, we didn't use a big enough box for me to use my necklace display on it, and I only had the one light source, so despite having the diffused light, I still got funky shadows.
So I ended up going back to a variation of the table-at-the-window-natural-light-plus-white-paper set up. I don't have a picture of that one, though. (Sorry.) In that case, I added a piece of light weight super thin mdf board covered with tinfoil to use as a light reflector, and two pieces of white mdf as a base and back-board in order to reduce my reliance on keeping sheets of white paper clean and unwrinkled. (I did also have a habit of using the nearest piece of paper as note paper when taking messages or jotting down ideas, often that was the paper that I was using as my backgrounds... oops).
Within the past two months, I have been getting more and more discontent with my set up as I haven't been getting home from my first job until after dark. How can I take pictures using natural light when it's dark out? Using just the light in my house isn't feasible as I have yellow walls, and yellow toned lights, and it's really hard to get good quality pictures when everything looks jaundiced.So I started looking for "real" light boxes. I finally talked myself into "splurging" for a light box. I found one on amazon for $25 that is big enough to fit all of my jewelry paraphernalia and still get me good backgrounds. It had great product reviews and didn't break the bank. So I bought it!
Remembering the debacle with my one little light, I also found a set of "real" mini photography lamps. I got those too! They were "only" $50. I justified their purchase with the knowledge that a) I didn't have 2 portable lights, b) I couldn't very well take good photographs in the dark, and c) I actually had money available from my store to pay for them - they're a legitimate business expense!
As soon as they both arrived, I couldn't wait to get them set up. But I had to figure out WHERE! I did not want to set up a "permanent" photography studio in my dining room. Granted, that's where all my jewelry stuff has been for the past two years, only getting hurriedly packed up every time someone came over for dinner or for a visit. However, I wanted to set up something a bit more permanent and less likely to make my dining room look like a disaster.
So I set them up in our spare bedroom... If you're coming to visit, know that until the few moments before you came, that room looked like a jewelry-box and photo-studio exploded.
The spare room is less likely to need to be hurriedly cleaned up, AND I get the added benefit of being able to close a door on the mess.
Here's my newest set up. If you can't tell, it's actually set up on a couch that we have in the spare room. I re-cycled the mdf boards from my previous set up and used them as a "tabletop" across the seat of the couch, allowing the lights to be set up on either side of the light box.

The only downside, is that it's low to the ground. Never mind... I've improvised yet again! I've got an old milk crate that I've topped with a couple of old bed-pillows. Makes a nice low stool! So now, I'm getting much more consistent photos, at any time of day, and I don't feel so bad leaving it up all the time!
So that's it...how my set up has evolved over time. To be honest, it hasn't really changed the over quality of my photos. It has changed the CONSISTENCY of my photos. With my first set ups, I had to take 20-30 photos on average of each of my items in order to get 4 or 5 great photos for my listing. Now, I can take fewer photos to get the same number for my listings. They're still great photos, no matter whether I used the point-and-shoot or the DSLR. They've still got great detail, no matter whether I used the pile of books next to the window, or my fancy light-box.
For me, it has just made the process easier to have nicer, more CONSISTENT equipment. Each time I've "upgraded," taking photos has become easier, more pleasant, and something I look forward to more.
Although, to be even more honest, I do think my quality has improved too. That has come with practice, reading blogs about product photography, and watching YouTube videos about product photography.
I still don't think I'm an expert. In fact, I KNOW that I'm not an expert. But at least I'm still learning and sharing what I've learned!

Wednesday, November 14, 2012
Black Friday Promotion!
All our items will be 20% off starting at noon on Thanksgiving Day and running through Midnight on Monday the 26th!
Be sure to visit our Etsy store to get some fantastic deals!
Friday, November 2, 2012
The jewelry allows me...
The jeweler allows me to wear the sapphire blue lake on my finger, the emerald
green leaves around my neck, and take the citrine sunset with me wherever I go.
Jewelry has become my daytime link to nature in an office with no windows. And
if I have to work late, there's nothing like diamond stars and a pearl full moon
against an onyx night sky.
~Astrid Alauda, "Office With No Windows"
~Astrid Alauda, "Office With No Windows"
Subscribe to:
Posts (Atom)